


")


Suspension Calculator App
Our Suspension Calculator makes setting up your suspension super easy. All you have to do is add your height, weight, and Specialized bike model, and you'll get all the info you need to take your ride to the next level.
Fine-tune your suspension here
Our Suspension Calculator makes setting up your suspension super easy. All you have to do is add your height, weight, and Specialized bike model, and you'll get all the info you need to take your ride to the next level.
Fine-tune your suspension here
Your Authorized Specialized Retailer can help you set up your suspension. To do it at home, you'll need your bicycle user manual, a shock pump, all your normal riding gear, and someone to help you.
Set air shock pressure and sag
Look up the sag recommended for your frame in your user manual.

If you do not have your manual handy, you can estimate about 30% of shock stroke for trail bikes and slightly less than 30% for cross country bikes. To find this measurement:
- Release all the air from the shock and fully compress it so that it bottoms out.
- Refill the shock with air and measure the stroke length.
- Multiply the stroke length by 0.3 to calculate 30% sag.
- Set your rebound and compression adjustment to the open or trail positions. Unscrew the air valve and thread a shock pump onto the air valve. Add air pressure (in psi) equal to your body weight including all riding gear.
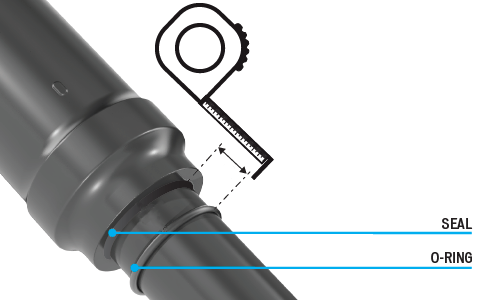
- To check the sag, push the o-ring against the seal, then mount the bicycle while propped up against a wall. Sit in the saddle in a normal riding position, without bouncing. Do not set sag while riding!
When the pressure is correctly set, the o-ring will move about 30% of the shock stroke distance after the rider's weight has been applied to the bike with no bounce.
Add more air pressure if your sag is greater than 30%; release air pressure if your sag is less than 30%. Repeat steps 3-4 until your sag is correctly set.
To set your sag correctly, measure from the seal to the o-ring as shown in the image below, after following the above steps.
Adjust rebound
Rebound damping (usually a red knob) controls how quickly the shock returns after a compression. The rear shock has a range of rebound clicks to fine-tune the rebound return rate. See your user manual for the suggested rebound adjustment. Use the below steps as a guide.
- Start with the rebound set in the middle of the click range.
- Turn clockwise for slower rebound (heavier riders, slower speed, bigger hits).
- Turn counter-clockwise for faster rebound (lighter riders, faster speed, smaller bumps, and greater traction).
Set fork shock pressure
Most forks with an air spring have a small decal on the back of the fork’s lower leg to indicate suggested air pressure for your rider weight, including all riding gear. You can also find this information in your user manual. If you don't have this information handy, you can estimate 1/2 of your rider weight.