Tarmac SL7 Setup
Cockpit
The Tarmac's use of fully integrated cables within the bars, stem, and frame mean that it's important to determine your drivetrain first (electric or manual) before cockpit assembly.
After you choose your drivetrain, select the proper headset cover:
- Integrated Tarmac Stem with electronic shifting
- Integrated Tarmac Stem with mechanical shifting
- Universal cap for a standard stem and round spacers with either electronic or mechanical shifting
All three headset covers are included in the small parts box, or can be ordered as the plastic parts kit S202500009.
| Lower headset cover-mechanical | Lower headset cover-electric | Lower headset cover-non Tarmac stem |
|---|---|---|
|
|
|
If the rider is using a Tarmac stem, there are three 10mm spacers and one 5mm spacer available. The upper headset transition cover is placed on top of the spacers (if used). There is no upper headset transition cover if the rider is using a non-Tarmac stem. These are also included in the small parts box and the plastic parts kit S202500009. These spacers can be used to fine-tune fit.
| Upper headset cover | 5mm spacer | 10mm spacer |
|---|---|---|
|
|
|
Stem adjustment
If you wish to install a longer or shorter stem on your Tarmac, the internally routed Tarmac stem is available in sizes ranging from 70mm to 140mm, with 6 or 12 degrees of rise. Contact your Specialized retailer if you wish to purchase an additional stem, or you can purchase one online at www.specialized.com. Please note that the Tarmac stem uses a non-standard torque pattern as shown below. The upper bolts must be tightened and torqued so there is no gap at the top of the stem faceplate (1 in image below) before the bottom bolts are tightened and torqued.

After the stem is installed, the Tarmac uses a top cap (same part as the Venge) S182500012.
There are two stem cover options: open and closed. If a rider chooses to cut their steerer flush with the stem, they should use the closed stem cover. If the rider wishes to use an additional spacer above the stem, they should use the open stem cover. Both Stem Covers are included in the plastic parts kit (S202500009).
| Closed stem cover | Open stem cover |
|---|---|
|
|
Saddle Height
To adjust the saddle height, begin by moving the rubber grommet up the seatpost to expose the seatpost wedge bolt. Loosen the seatpost wedge bolt using a 5mm hex. Apply grease to the seatpost wedge ramp faces and bolt. Apply carbon paste to the seatpost at the clamping area. Adjust the saddle height as needed. Ensure that the seatpost insertion is within the range shown below. Damage to frame and seatpost may occur if the seatpost insertion exceeds the value listed. Torque the seatpost wedge bolt to 6.2Nm (55 in-lbf) and slide the rubber seatpost grommet back onto the frame.
| Size | Minimum insertion | Maximum insertion |
|---|---|---|
| 44 | 75mm | 143mm |
| 49 | 75mm | 138mm |
| 52 | 75mm | 149mm |
| 54 | 75mm | 175mm |
| 56 | 75mm | 185mm |
| 58 | 75mm | 207mm |
| 61 | 75mm | 230mm |

Tire Pressure & Tubeless Conversion
Tire Pressure
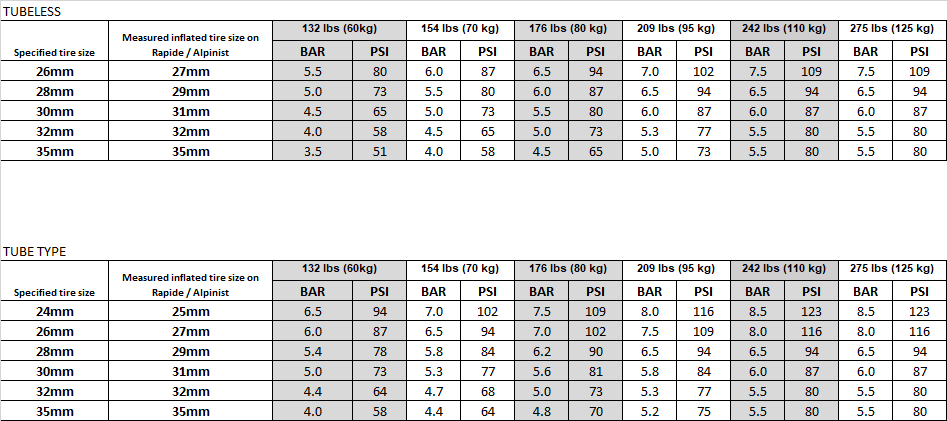
Running the correct tire pressure is crucial for a controlled and enjoyable ride.What you see below is a recommendation of a starting point or a "ballpark" tire pressure based on rider weight and tire size. Your preferred tire pressure may vary according to load, terrain, conditions, and ride style. Front tires can be inflated with less pressure than rear tires. You'll also see a decal on your wheels indicating maximum inflation pressure--never exceed the maximum inflation pressure of your tires or rims. Enjoy your ride!
The right tire pressure for your ride is personal and depends on your riding style, the terrain you'll be riding and the conditions of that terrain on the day you're riding. What you see below is a recommendation of a starting point pressure, a "ballpark" if you will, based on rider + gear weight and tire width. You'll also see a decal on your wheels indicating maximum inflation pressure. Never exceed the maximum inflation pressure of your tires or rims. Enjoy your ride!
Road Tire Pressure Data Table

Need more information on tire treads and casings? Visit our Road Tires page.
Tubeless conversion
Many riders choose to convert to tubeless tires to prevent pinch flats. Tubeless tires allow riders to use lower inflation pressure without the risk of damaging a tube from impacts. See the table below for the tubeless compatibility of your bike model and year. Please ensure that both your rims and tires are tubeless compatible before proceeding. For more information, see our Tubeless Conversion page.
Model | Year | Tubeless Compatible? |
|---|---|---|
| SW | 2023 | Yes |
| SW | 2021-2022 | No |
| Pro | 2022 | Yes |
| Pro | 2021 | No |
| Expert | 2021-2023 | Yes |
| SL6 Comp, Sport, Base | 2021-2023 | Yes |


