


")


2019-2021 Turbo Levo Setup
Fit
Ensuring that your Levo is properly fit to you is an important step in preparing for your first ride. Your Authorized Specialized Retailer will be able to provide a basic fit, ensuring that you are able to ride comfortably and efficiently. Specialized also offers Retül Fit, a data-driven bicycle fitting tool designed to improve comfort, prevent injury, and increase performance.
Retül can help you estimate your Levo bike size and saddle height here.
Adjusting saddle height
When adjusting the saddle height or installing an aftermarket dropper post, it is important to ensure the insertion depth is within the acceptable range. Minimum insertion for all frames sizes is 100mm.
All models use a 34.9mm seat post and a 38.6mm seat clamp.
Tire Pressure & Tubeless Conversion
Running the correct tire pressure is crucial for a controlled and enjoyable ride. What you see below is a recommendation of a starting point or a "ballpark" tire pressure based on rider weight and tire size. Your preferred tire pressure may vary according to load, terrain, conditions, and ride style. Front tires can be inflated with less pressure than rear tires. You'll also see a decal on your wheels indicating maximum inflation pressure--never exceed the maximum inflation pressure of your tires or rims. Enjoy your ride!
Note that extra wide tires generally require wider rims. The maximum rear tire width for the frame is 29x2.6" or 27.5x3.0".
The right tire pressure for your ride is personal and depends on your riding style, the terrain you'll be riding and the conditions of that terrain on the day you're riding. What you see below is a recommendation of a starting point pressure, a "ballpark" if you will, based on rider + gear weight and tire width. You'll also see a decal on your wheels indicating maximum inflation pressure. Never exceed the maximum inflation pressure of your tires or rims. Enjoy your ride!
Mountain Tire Pressure Data Table
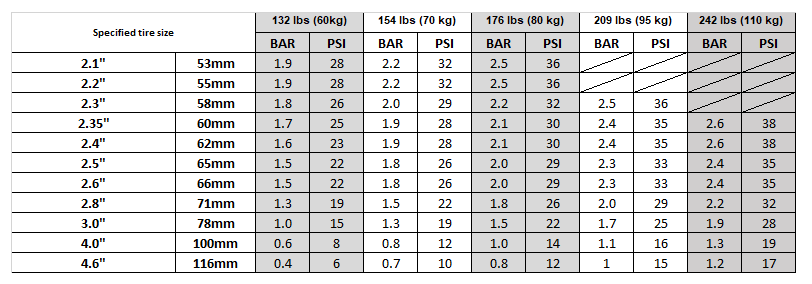
*Crossed out cells: tire size not recommended, as the rider's weight may require a tire pressure that is too high for the tire or rim.
Need more information on tire treads and casings? Visit our Mountain Tires page.
Tubeless conversion
Many riders choose to convert to tubeless tires to prevent pinch flats. Tubeless tires allow riders to use lower inflation pressure without the risk of damaging a tube from impacts. All Levo models are equipped with tubeless-compatible rims. Ensure that the tires on your model are also tubeless compatible before proceeding. For more information, see our Tubeless Conversion page.
Suspension Setup
Proper suspension setup is crucial for achieving the best ride experience on a full suspension bike. Please refer to our Suspension Calculator for easy suspension setup tips.
Powering On & Off
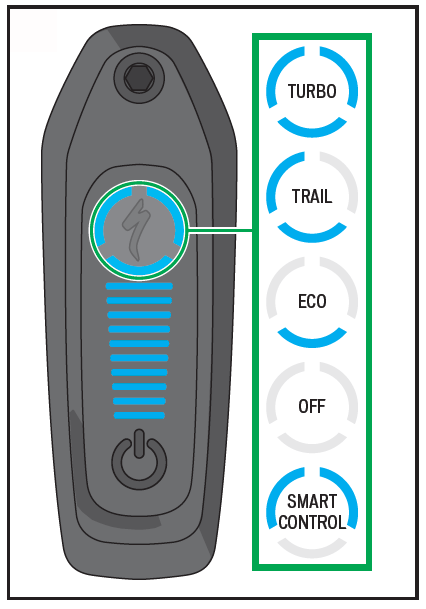
- To start the system, press and hold the POWER button located on the Turbo Connect Unit until the horizontal LEDs glow blue. The number of LEDs that glow blue will indicate the level of charge in the battery.
- To switch support modes, press the MODE button on the display (cycles through TRAIL > TURBO > ECO) or the remote (+ or - buttons to go up or down through the modes).
- To turn the battery (and support) off, press and hold the POWER button until the LEDs turn off.
Charging
- Regularly inspect the battery and charger for damage. Never charge a battery which you suspect is damaged or know is broken, and do not use it.
- Make sure the charging socket and plug are clean and dry before connecting and charging the battery.
- Only use the supplied charger cord. Ensure the cord plug is fully inserted in the charger before plugging the charger into a power outlet.
- Only use the Specialized charger supplied with the bicycle or other chargers approved by Specialized. Inspect the charger before every use for possible damage to the charger itself, the cable or the charging plug. Never use a charger which you suspect is damaged or know is broken.
- Place the charger on a stable, level surface unaffected by heat. If the battery is charged outside of the frame, place the battery on the same surface as the charger.
- You should charge the battery in a dry, well ventilated area and make sure the battery and charger are uncovered during the charging process. Ensure that the battery and charger are not exposed to any flammable or dangerous substances.
Charging instructions
- Plug the charger plug into an outlet (100 - 240V), using the appropriate plug for the country’s standards.
- Locate the charging socket on the non-drive-side of the battery, near the crank.
- Turn off the battery and unplug the wiring harness.
- Connect the charging plug with the charging socket on the battery. You should charge the battery in an area with a smoke detector.
- The four green LEDs next to the charging socket indicate the level of charge in the battery in 25% increments
- When charging is complete, disconnect the charging plug from the battery socket.
- Unplug the charger from the wall socket.
Mission Control App
The Mission Control app is the best way to get the most out of riding a Specialized Turbo, and it's completely free! With the app, riders can control motor output, range, diagnose the system, record rides, sync them with Strava and more.
Device Updates (Available for Levo & Kenevo Gen 2 bikes)
Currently the device updates through Mission Control are only available to:
- Levo Gen 2 Bikes (Model Year 2019-2021)*
- Kenevo Gen 2 Bikes (Model Year 2020-2021)*
*with TCU1 and Brose 2.1 motor (firmware 7.4.1).
Giving riders the ability to update their motor and Turbo Connect Unit firmware is in response to feedback we have received from riders. The updates come with further improvements for torque peak spikes and walk assist improvements. The update process can take up to 10 minutes. You will need to stay in connection range with the bike during the updating process. Also stay attentive to its progress to ensure the update completes successfully and no error messages appear.
Note: If you did not save your tune settings as a preset before the update, your bike will revert to the default settings.