")


Turbo SL System
Motor
The Specialized SL 1.1 is a custom motor that uses a magnesium case for low weight and corrosion resistance. The assembled motor weighs 1.95kg.
The SL 1.1 motor is a 48v brushless, geared design and offers a maximum output of 240w. An integrated power meter records the rider's input power and cadence.
Battery
All Vado SL models feature a 320Wh Li-ion main battery and are compatible with the 160Wh Range Extender. Batteries for the Vado SL are fully internal and not removable unless performed by an Authorized Specialized Retailer.
A Y-Splitter charger cable is available to allow both the main battery and the Range Extender to be charged simultaneously (98920-5660). The Y-Splitter may be used only to charge one internal and one Range Extender battery.
Range Extender Battery
Specialized Turbo SL bikes are compatible with the external Range Extender battery. This battery fits inside a bottle cage and adds 160 Wh (50% of range), which roughly translates into 1 hour of additional ride time in flat/hilly terrain. It is compact and only weighs 1 kg.
- First, power off your bicycle and the Range Extender (RE).
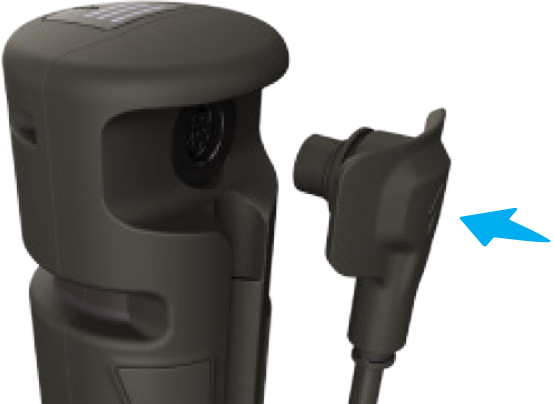
- Insert the end of the power cable with the rounded cover into the port on the RE.
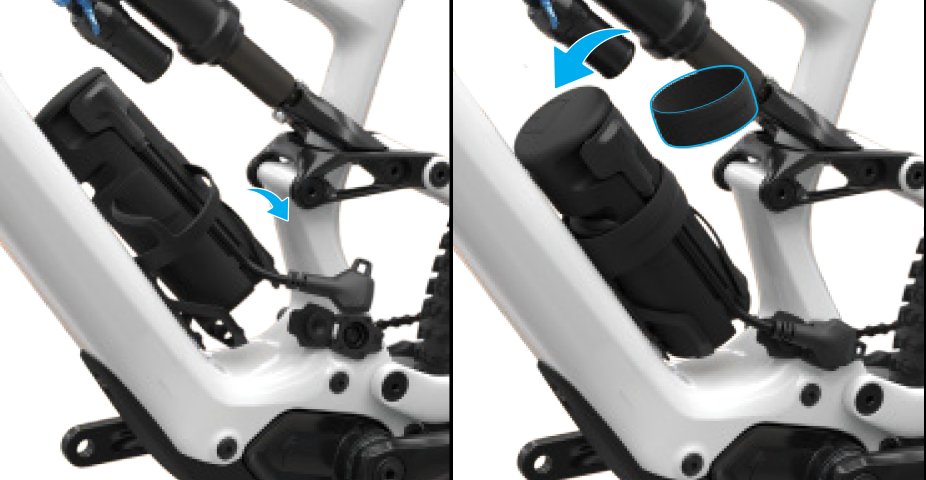
- Insert the RE into the Zee bottle cage and secure it with the battery retainer band.
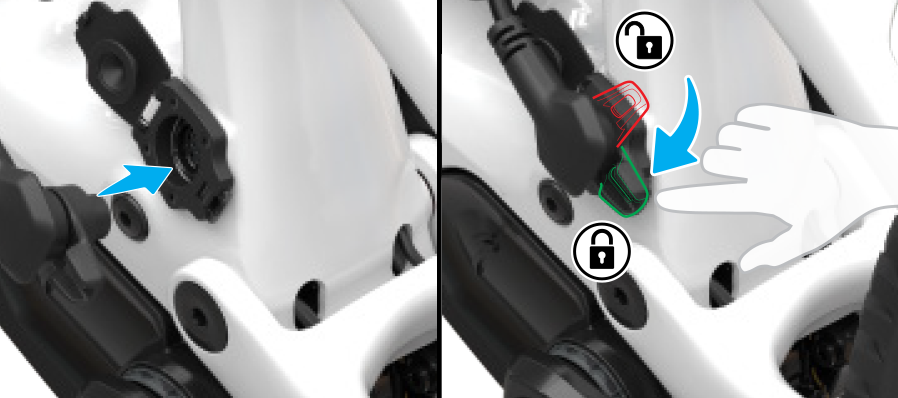
- Open the charge port and insert the RE plug. Once the plug is correctly seated, twist the lever on the connector clockwise to lock the cable in place.
- Turn on the bicycle and verify the RE is successfully connected by looking for the RE battery level on the display unit.
The system will automatically draw from the bike's battery and the Range Extender (RE) at the same time. If you have multiple REs and prefer to use the Range Extender battery first, you can change this setting in the Mission Control app.
User Interface
2022 and later Vado SL 5.0 models will come with the new MasterMind Turbo Connect Unit (TCU). The 4.0 models will come with the original TCU. Previous models of the Vado SL all featured the original TCU.
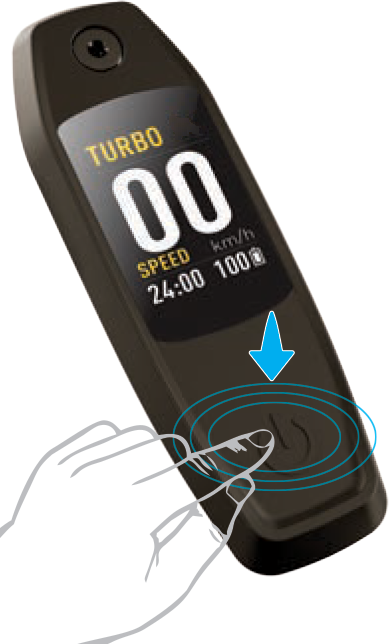
Turbo Connect Unit (TCU) or MasterMind TCU
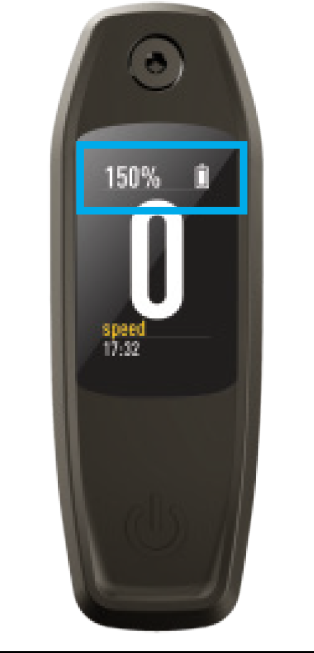
Both units are installed within the top tube and can be used to power the bike on and off. The TCU enables you to change support modes and view current battery charge level. The MasterMind TCU has a customizable LCD display that shows speed, battery charge, mode, heart rate, and other settings.
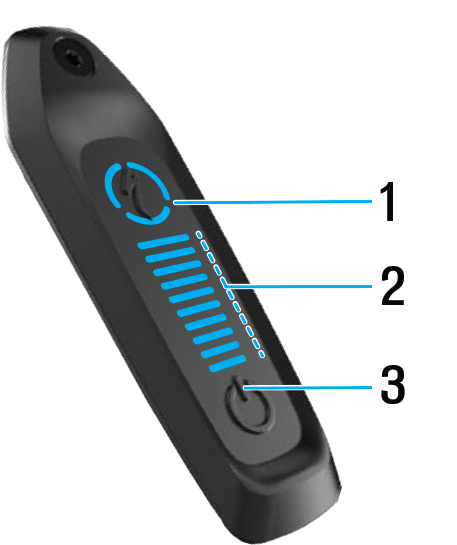
| TCU | |
|---|---|
| 1 Change support modes 2 Battery change level 3 Power on/off |
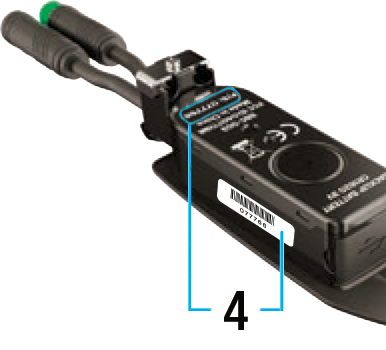
| To pair with Mission Control app, you need to enter the six digit pincode (4) in the app. The pincode is located on the removable frame decal on the top tube, which should be placed on the last page of your user manual for future reference. The pincode is also located on the bottom or side of the TCU (the display must be removed from the frame to see it). |
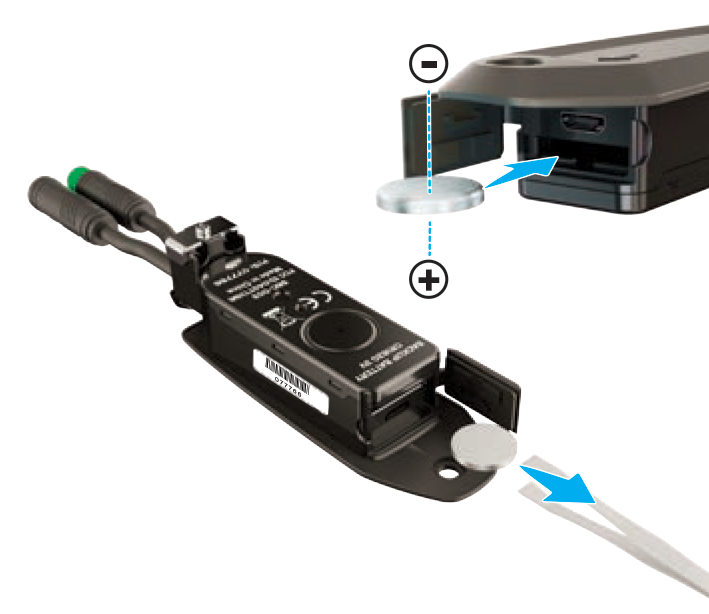
| The TCU uses a CR 1620 coin cell battery. To change the battery, remove the TCU from the frame with a T-10 wrench. Open the battery door and remove the old battery with non-metallic tweezers. Carefully install the new battery. Note: you may short circuit the battery if you use metallic tweezers. |
| MasterMind TCU | |
|---|---|
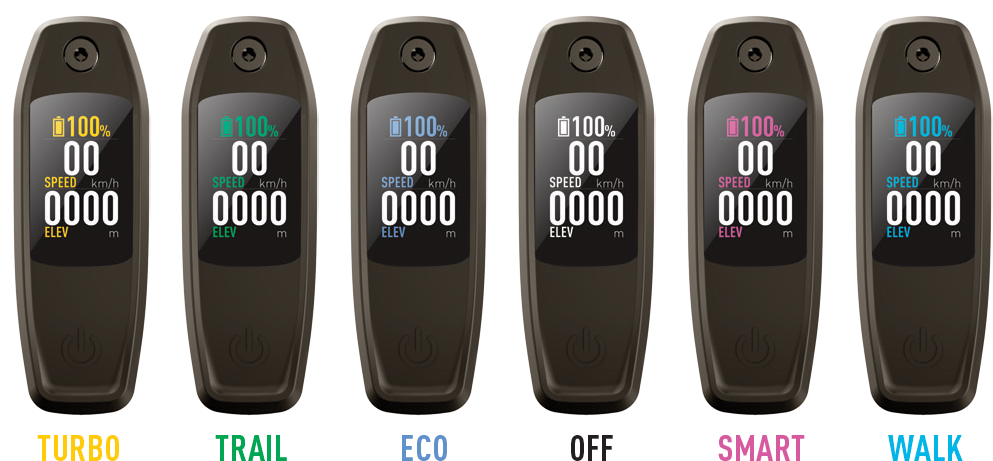
| The MasterMind TCU features the same power button as the TCU. You can change support modes on the remote. |
| The MasterMind TCU uses different colors to indicate which support mode is in use: Yellow: Turbo Green: Trail Blue: Eco No color: Off Pink: Smart Control Light blue: Walk Assist |
To pair with Mission Control app, you need to confirm the six-digit pincode in the app. The pincode will appear on the MasterMind TCU display during the pairing process. | |
Note: Bikes equipped with the original TCU are not compatible with the new MasterMind TCU. Each of our Turbo bikes is designed to perform best with its original equipment. This is especially important for the control unit of the bike since it acts as the brain of the sophisticated e-system. If a TCU needs repair or replacement, please contact your Authorized Specialized Retailer for assistance.
Remote
There are two versions of remotes corresponding to the different TCU displays on specific Vado SL models.
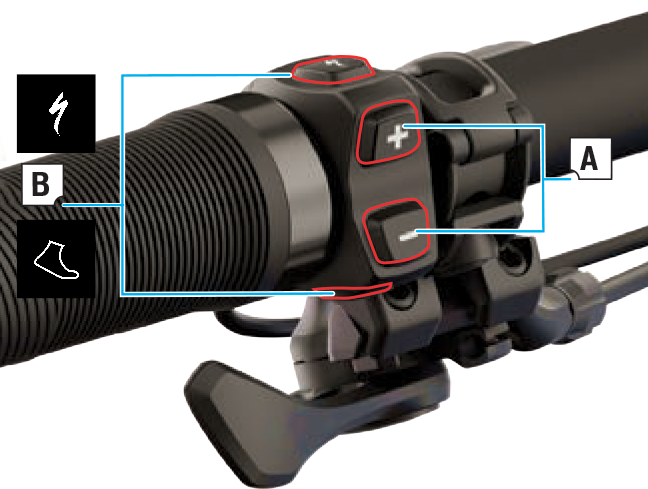
| TCU Remote | |
|---|---|
| A: + and - buttons:
B: Function buttons:
|
| MasterMind TCU Remote | |
|---|---|
| A: + and - buttons:
B: F1 and F2 buttons:
|

Turbo Connect Display (TCD)
The Turbo Connect Display (TCD) is compatible with the 4.0 models as an aftermarket add-on; it was included with previous 5.0 models featuring the original TCU. This wireless display connects via ANT+ to show all standard data of a bicycle computer plus Turbo-specific data such as remaining battery power %, rider power wattage, cadence, and selected assist mode. It even allows for connecting a heart rate monitor.
How to Setup and Use Your Turbo Connect Display (TCD)
Key elements:
- 2" LCD screen with customizable data fields
- Permanent backlight illumination when bike lights are on
- Two wired connections
- Wire 1: goes directly to the motor for trouble-free operation
- Wire 2: connected to handlebar Remote
- Screens are switched by handlebar Remote or display buttons
- Features Bluetooth and ANT+ connectivity to make it compatible with Mission Control App and ANT+ devices (e.g. heart rate belt to show heart rate on display)
- Screen shows pairing code you have to enter in Mission Control App
- Internal 1220 coin cell to store the clock setting
- When coin cell runs low, "Low Bat" will appear on TCD-w
- An empty coin cell does NOT lead to a malfunctioning TCD-w, only the clock setting cannot be saved any longer
TCD-w navigation
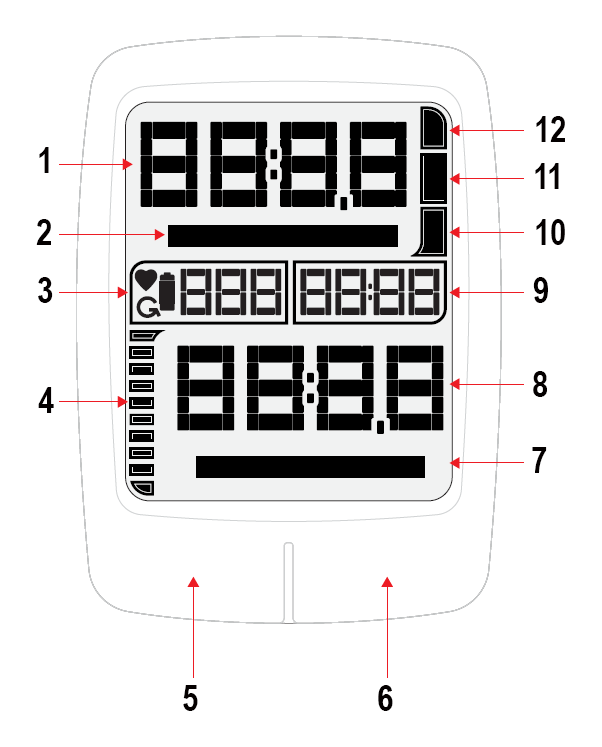
Pushing the left button (shown in blue below), cycles through the top data field options to show your current, average, and maximum speed.
Pushing the right button (shown in red below), cycles through the bottom data field options to show your current distance, timer, power, energy expenditure, and odometer.
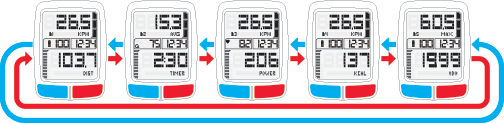
TCD-w features
| 1 Top data field: current, average, and maximum speed 2 Top data field descriptor 3 Heart rate, cadence, and battery 4 Main battery level, shown in 10% increments 5 Left button 6 Right button 7 Bottom data field descriptor 8 Bottom data field: current distance, timer, power, energy expenditure, and odometer 9 Clock 10 Eco mode 11 Sport mode 12 Turbo mode |